If you’ve done any kind of travel by yourself, then you know that skill, knowledge and resourcefulness are the three things that’ll pull you out of tight situations.
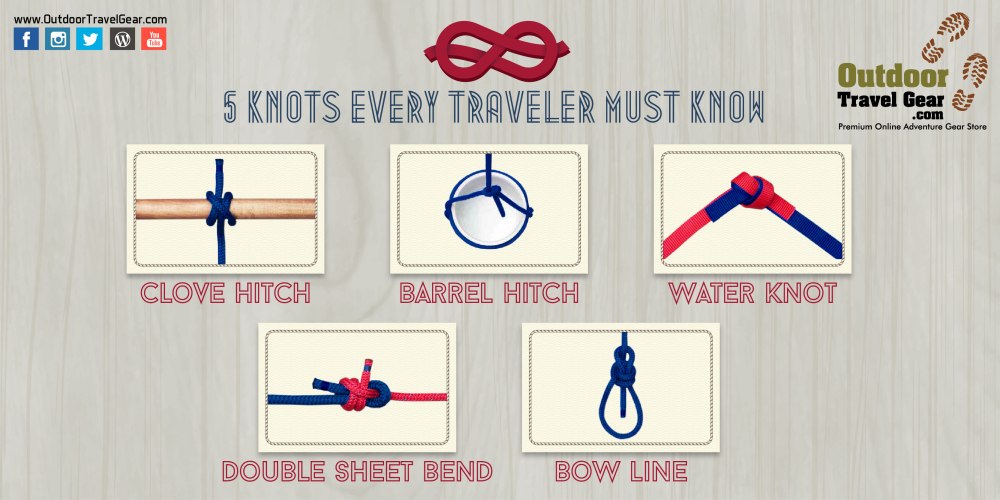
And the knowledge of these basic 5 knots will add to your skill-set, because these knots are simple to memorise, are versatile and can be used in a large variety of scenarios.
From securing luggage to rescue operations, knots are used everywhere. We recommend that you use this list of 5 basic knots as a starting point and then find out more knots that may be specifically useful in situations that you’re likely to face in your preferred mode of travel.
Clove Hitch
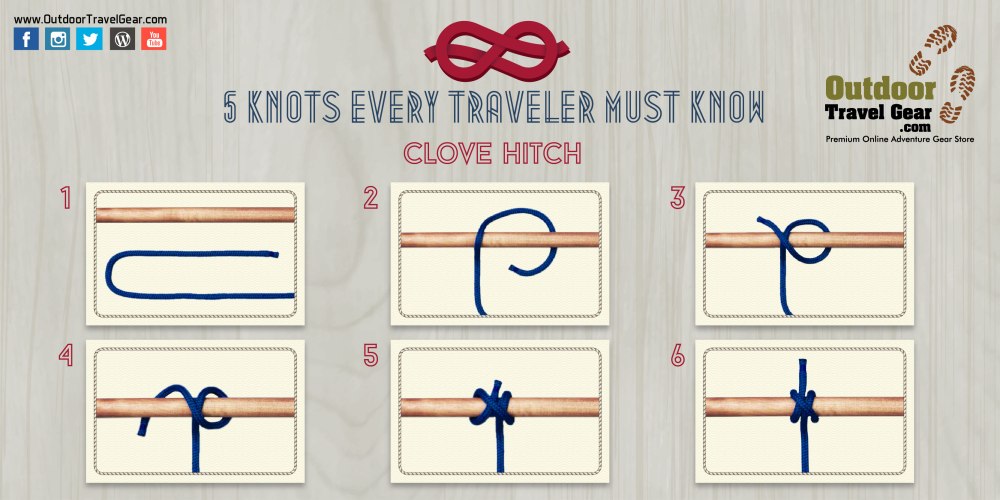
OTG 5 Knots Every Traveller Must Know_Clove Hitch
The clove hitch is a basic knot. It is primarily used for anchoring a rope to an object or an anchor; or to anchor an object to an anchor with the help of a rope. This knot is especially preferred when the object has a huge load bearing, as it is way easier to untie the Clove Hitch as compared to the Double Figure of 8.
To tie a clove hitch:
- Pass the end of the rope around the anchor, and make a right hand loop
- Continue over the standing end of the rope and around the pole a second time, this time making a left hand loop
- Thread the end of the rope under itself (on the left of the standing end) and pull tight to form the clove hitch
- Finish off with a thumb knot or the overhand knot
Tip: Though the clove hitch is a basic and versatile knot, be careful when using it. The clove hitch has a tendency to slip or bind if not finished off with a thumb knot (overhand knot).
Barrel Hitch
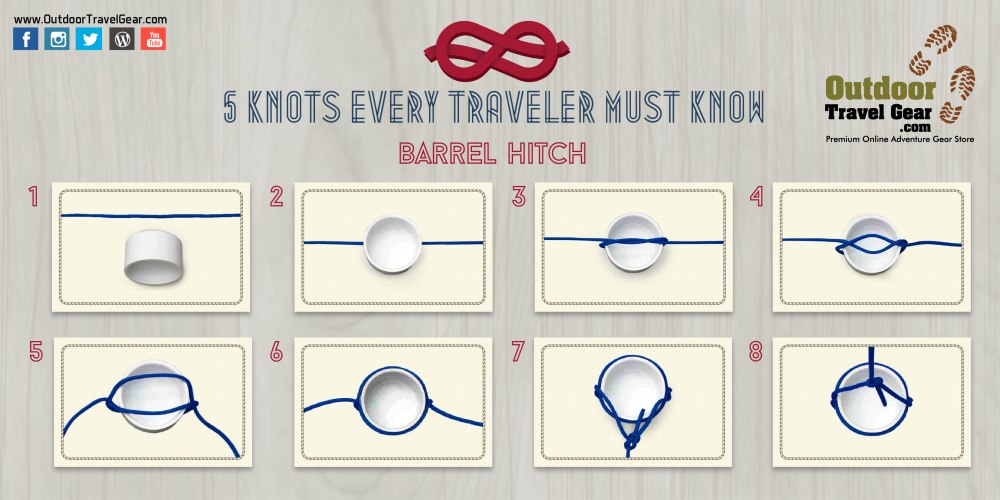
OTG 5 Knots Every Traveller Must Know_Barrel Hitch
This is a very utilitarian knot. Typically, this knot is used to create a temporary carrying mechanism for an open liquid container, like a barrel of water. However, as you can see, one can use this knot for carrying or hanging any load that doesn’t have a handle of its own.
To tie a barrel hitch:
- Lay an overhand knot on the floor.
- Move the right-hand loop downwards and create a figure of 8 appearance
- Place the barrel (or load) in the centre and tighten the knot such that the 2 outer loops tighten around the perimeter of the barrel
- To secure the barrel, tie the 2 loose ends of the rope with a bowline knot
- Finish off with a thumb or the overhand knot
Water Knot
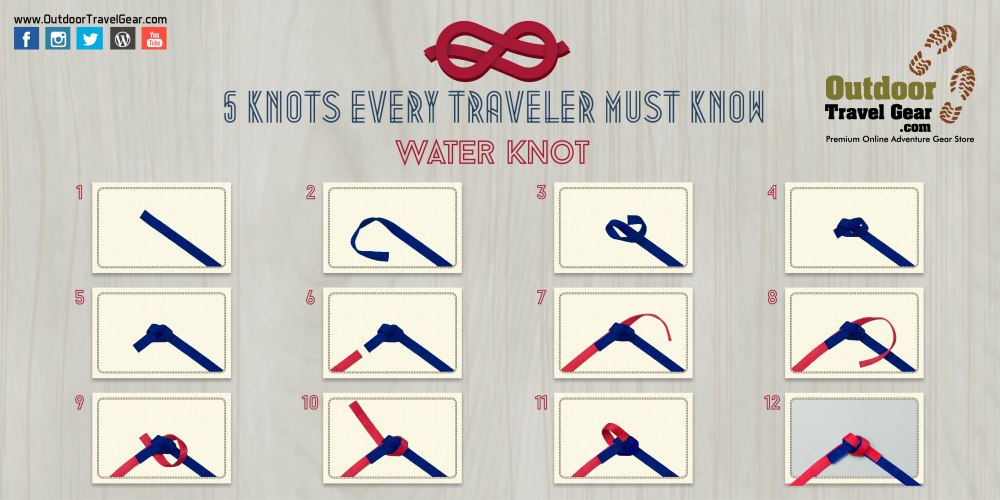
OTG 5 Knots Every Traveller Must Know_Double Sheet Bend
The water knot is nothing but a variant of the overhand knot. This knot is ideal for joining 2 lengths of tapes or 2 ropes of the same diameter. It is sometimes also called a ring bend.
To tie a water knot:
- Tie a overhand knot at the end of one of the ropes but don’t tighten it, keep it loose
- Weave the other rope through the knot, following the flow of the rope, but in the reverse direction. (Start weaving the second rope, where the first rope ends and follow the path of the knot through to the other end)
- Pull the two ropes tight
- Finish off with a thumb knot or the overhand knot
Double Sheet Bend
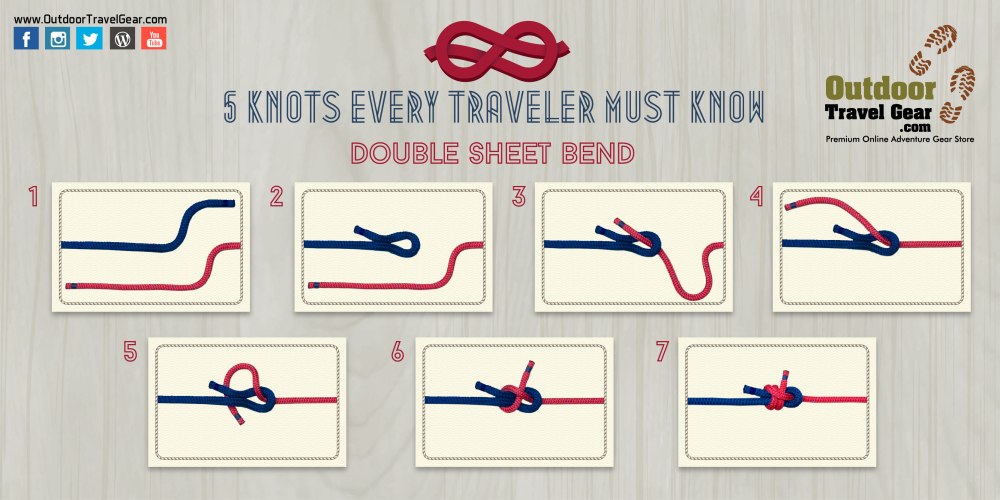
OTG 5 Knots Every Traveller Must Know_Double Sheet Bend
The double sheet bend is a clever knot. It is the improved and safer version of the simple sheet bend, and we recommend using the double sheet bend whenever possible, instead of the simple sheet bend.
When using ropes, there’s often a need to join 2 ropes together, because a single length of rope is insufficient for the needed application. More often than not, the 2 ropes available are of different size (diameter). This is where the sheet bend comes in play.
To tie a sheet bend:
- Form a bight (loop) in the thicker rope
- Pass the thinner rope under the loop of the thicker rope, bring it over and then pass it behind the standing ends of the thinner rope, in that order
- Tuck the thinner rope under itself twice to finish the knot
- Finish off with a thumb or the overhand knot
Tip: Always start tying the double sheet bend with making the bight (loop) in the thicker rope and passing the thinner rope through it. This method has been tried over time and is proven to give the best results.
Bow Line
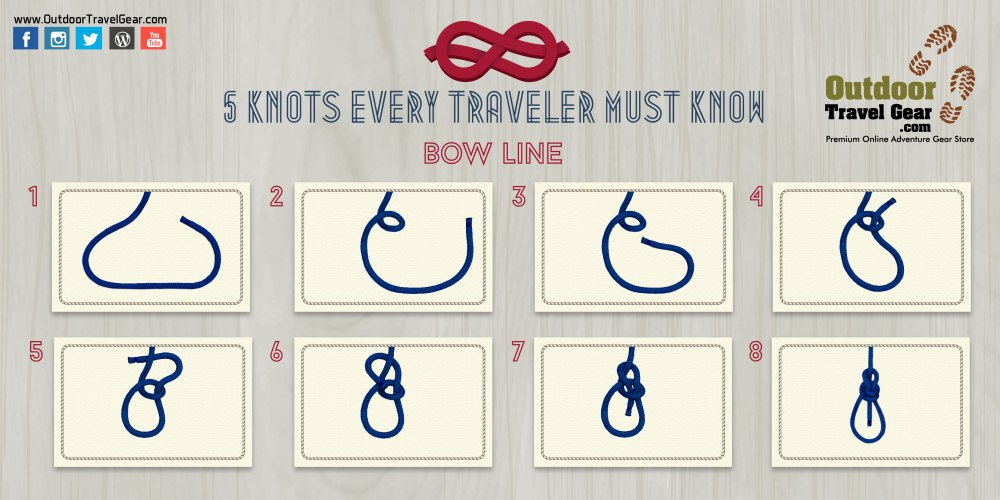
OTG 5 Knots Every Traveller Must Know_Bow Line
The bow line is one of the more complicated knots from this series, but if you learn it well, it can literally be a life saver. In the absence of a purpose built harness, a bow line knot can be repurposed as a harness. Apart from that, it can be used as a noose or generally as a fastening knot.
To tie a bow line:
- Make a small full circle loop, with enough rope for the desired loop size
- Pass the end of the rope through the loop
- Continue by passing the end of the rope under the standing end and then bring it back through the small loop
- Finish off with a thumb knot or the overhand knot
Tip: Always finish off a bow line knot with a thumb knot (overhand knot), for added measure of security.
Bonus Tip: Knot Dressing
Knot dressing is the process of arranging a knot in a manner that improves its performance. Crossing or uncrossing the rope in a specific way, depending on the knot, can increase the knot’s strength as well as reduce its jamming potential. Every knot needs to be dressed well and should look clean and neat for optimum performance of the knot.
So there it is! Our list of 5 knots that every traveler must know!
Make sure you know the knot in and out before using it in a real scenario. A knot tied the right way comes in handy, but a knot tied a wrong way can be dangerous!
www.OutdoorTravelGear.com
# OutdoorTravelGear #GetOut
